Sunday, August 24, 2014

Plugging Away...

More progress...crosses added to the upper wing. These are from the WNW set and I don't use the Solvaset. They sat down nice and tight over the Aviattic lozenge with just water. I sprayed the fuselage and lower wing assembly with Polly S satin finish and then pulled the Saran Wrap masking off and am currently doing a bit of touch up work.  photo 20140824_143909_resized.jpg  photo 20140824_143934_resized.jpg  photo 20140824_143946_resized.jpg

Thursday, August 21, 2014

Progress...

More progress....waiting for the upper wing lozenge to dry. Time to gloss coat the fuselage/lower wing and start some washes (glazes), weathering, and picking out the small details.  photo 20140821_163050_resized.jpg  photo 20140821_163017_resized.jpg

Tuesday, August 19, 2014

Upper Wing...

Applying the Aviattic lozenge to the underside of the upper wing. I thought I would try something different...I usually work over a gray primer but for the upper wing I lightly over sprayed it with Vallejo Air White. Though it looks really white in the picture, I just kind of covered the gray, not spraying it a solid white. I am really happy with how it is looking so far. Kind of fun experimenting with the Aviattic lozenge!  photo 20140819_173323_resized.jpg

Sunday, August 17, 2014

Painting Continues...

Preliminary colors sprayed...I used Tamiya Red Brown with a couple of drops of White for the cowling and Tamiya Dark Grey for the fuselage. Most accounts describe "U10" as being painted slate grey, almost black. I also highlighted the louvers a bit and painted the gas cap covers. When fully dry I will seal it with a gloss cote in preparation of weathering and decals.  photo 20140817_120153_resized.jpg

Friday, August 15, 2014

Masking and Painting...

I masked the cockpit coaming with green painter's tape and airbrushed the lilac and green camouflage. I also sprayed the axel wing and the wheel covers. Second picture shows the green painter's tape has been removed and touchups on the paint were completed by hand. Still have to paint the gas caps brass and then I will pick out details with oil paints later. Too bad most of this detail will be tough to see with the upper wing mounted.  photo 20140815_133945_resized_1-1.jpg  photo 20140815_134458_resized-1.jpg

Wednesday, August 13, 2014

Primed...

Small steps but still moving forward...covered the pilot and engine with Saran Wrap and sprayed the fuselage with my usual gray primer. Next I will do some masking and paint the cockpit coaming lilac and green, the front cowlings chocolate brown, the fuselage a slate gray, and touch up the other details.  photo 20140813_164547_resized.jpg  photo 20140813_164519_resized.jpg

Friday, August 8, 2014

Lower Wing...

Lozenge in place on the lower wing. The wing is just temporarily fitted for the pictures.  photo 20140808_102635_resized.jpg  photo 20140808_102648_resized.jpg

Thursday, August 7, 2014

More Lozenge...

Aviattic lozenge applied to the upper flying surface of the lower wing. This was put down over a glossy gray primer. I used a touch of Solvaset followed by a blast from the hairdryer and everything snugged right down. Just a little trimming to do when fully dry.  photo 20140807_103110_resized.jpg

Wednesday, August 6, 2014

Fuel Cart Crew

Started some preliminary work on the fuel cart crew from Aviattic. Some assembly completed and putty added where the upper and lower torsos come together on the first figure. It looks like a small swipe of filler will be necessary at the arm joins, but that is pretty standard. Clean up of seam lines was a breeze. Both heads and the reaching arm of the second figure are just held in place with blue tack for these pics. Final placement of the heads, arms, and fuel hose will not happen until it starts to come together at the end of the entire build. The set comes with three heads giving you a few options for the figures. A very nice set sculpted by Steve Warrilow...who also sculpted the pilot in the cockpit.  photo 20140806_162112_resized.jpg  photo 20140806_162220_resized.jpg

Saturday, August 2, 2014

Lozenge

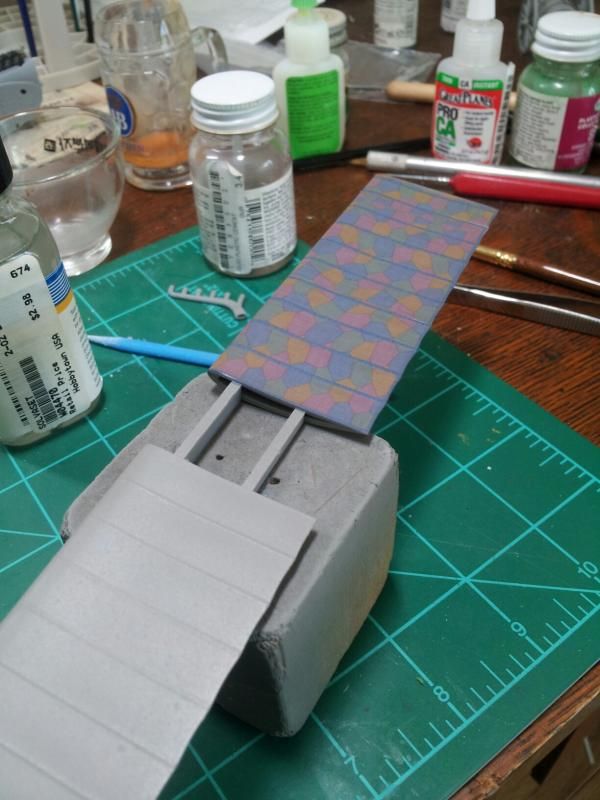
Taking a break from the fuselage, I started applying the lozenge. I am using the Aviattic OAW, 4 color, faded, with blue ribs. This is my second go at the Aviattic cookie cutter set...I used it the first time on my Fokker built DVII. I prepped the wing with gray primer followed by a clear gloss coat. I used some Solvaset and then hit it with a blow dryer and the decals set down quickly. I will eventually be using oil paints for some shadow and weathering effects...that's a ways off though.  photo 20140730_170009_resized.jpg

Engine cowls...

Working on the engine cowls. I had to remove three small louvers from each of the cowls (just to the right of the puttied seam) as per the "U10" instructions. WNW instructions call for filling these seams on both sides of the fuselage...I use Squadron Green putty diluted with a little Testors liquid cement. I'll sand them flush when the putty dries. The exhaust is not cemented into place yet. I will do some painting first and then attach.  photo 20140729_145537_resized.jpg